Archive for the ‘emulation’ Category

Why the EGA can only use 16 of its 64 colours in 200-line modes

Saturday, October 1st, 2011

This was a question which puzzled me when I first found out about it, but now that I understand all the history behind it, it makes perfect sense.

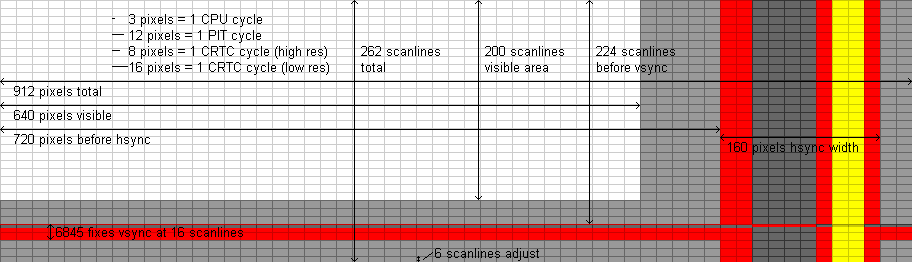
The IBM PC (5150) was originally designed output to an NTSC television in mind - hence the 4.77MHz clock speed (4/3 the NTSC color carrier frequency - allowing the video output and CPU clock to share a crystal). It was thought that home users would generally hook their PCs up the TV rather than having a separate, expensive, monitor. Another major limiting factor in the design of the CGA was the price of video memory - the 16Kb on the card would have been fairly expensive at the time (it was as much as the amount of main memory in the entry level PC). TV resolution is 912x262 at CGA 2-colour pixel sizes in non-interlaced mode, but TVs (especially CRTs) don't show all of the image - some of those scanlines and pixels are devoted to sync signals and others are cropped out because they would be distorted due to the difficulties of approximating high frequency sawtooth waves with high-voltage analog circuitry. So 320x200 4-colour and 640x200 2-colour packed pixel modes were chosen because they were a good fit for both 16Kb of memory and TV resolutions.

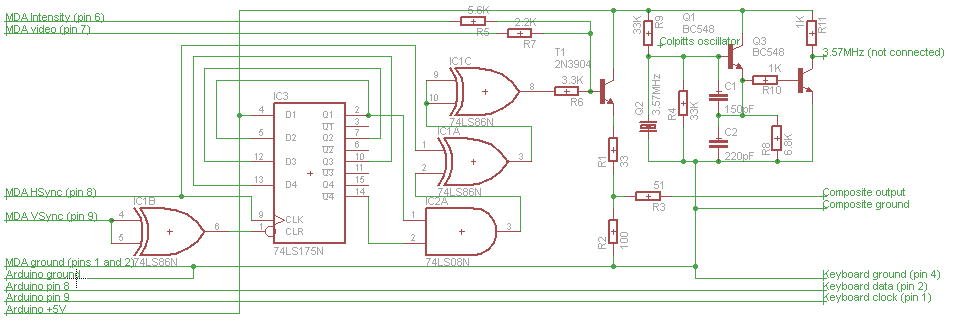
That system did work quite well for many home users - lots of CGA games have 16-colour composite output modes. But it wasn't so good for business users. These users tended not to care so much about colour but did care about having lots of columns of text - 80 was a common standard for interfacing with mainframes and for printed documents. But 80-column text on a TV or composite monitor is almost completely illegible, especially for colour images - alternating columns of black and white pixels in a mode with 320 pixels horizontally gets turned into a solid colour by NTSC. So for business users, IBM developed a completely separate video standard - MDA. This was a much simpler monochrome text device with 4Kb of memory - enough for 80 columns by 25 rows of text. To display high quality text, IBM decided on a completely different video standard - 370 scanlines (350 active) by 882 pixels (720 active) at 50Hz, yielding a 9x14 pixel grid for high-fidelity (for the time) character rendering. In terms of timings, the character clock is similar (but not identical) to that of the CGA 80-column text mode (presumably 16.257MHz crystals were the closest they could source to a design target of 16.108MHz). To further emphasize the business target of the MDA card, the printer port was built into the same card (a printer would have been de-rigour for a business user but a rare luxury for a home user). Business users would also usually have purchased an IBM 5151 (green-screen monitor designed for use with MDA) and IBM 5152 (printer).

CGA also had a digital TTL output for displaying high quality 16-colour 80-column text (at a lower resolution than MDA) on specially designed monitors such as the IBM 5153 - this seems to have been much more popular than the composite output option over the lifetime of these machines. The two cards used different memory and IO addresses, so could coexist in the same machine - real power users would have had two monitors, one for CGA and one for MDA (and maybe even a composite monitor as well for games which preferred that mode). The 9-pin digital connectors for CGA and MDA were physically identical and used the same pins for ground (1 and 2), secondary intensity (7), horizontal sync (8) and vertical sync (9) but CGA used 3, 4 and 5 for primary red, primary green and primary blue respectively whereas MDA used pin 7 for its primary video signal. MDA also used a negative-going pulse to indicate vertical sync while the CGA's vertical sync pulse is positive-going.

So for a while these two incompatible standards coexisted. The next major graphics standard IBM designed was the EGA, and one of the major design goals for this card was to be an upgrade path for both home and business users that did not require them to buy a new monitor - i.e. it should be compatible with both CGA and MDA monitors. This was accomplished by putting a 16.257MHz crystal on the card and having a register bit to select whether that or the 14.318MHz one would be used for the pixel clock (and by having the on-board video BIOS ROM program the CRTC appropriately). By 1984, it was not out of the question to put 128Kb of RAM on a video card, though a cheaper 64Kb option was also available. 64Kb was enough to allow the highest CGA resolution (640x200) with each pixel being able to display any of the CGA's 16 colours - these would have been the best possible images that CGA monitors such as the IBM 5153 could display. It was also enough for 4 colours at the higher 640x350 resolution - allowing graphics on MDA monitors. With 128Kb you got the best of both worlds - 16 colours (from a palette of 64) at 640x350.

IBM made a special monitor (the 5154) for use with the EGA. This monitor could display both 200-line and 350-line images (deciding which to use by examining the vertical sync pulse polarity), and allowed users would be able to take advantage of all 64 colours available in 350-line modes. The video connector was again physically the same and pins 1, 3, 4, 5, 8 and 9 had identical functions, but pins 2, 6 and 7 were repurposed as secondary red, green and blue signals respectively, allowing all 64 possible colours. But they wanted this monitor to be compatible with CGA cards as well, which meant that in 200 line mode it needed to interpret pins 3-6 as RGBI instead of RGBg and ignore pins 2 and 7. So even with a 5154, the EGA needed to generate a 4-bit signal when connected to a CGA monitor, disabling pins 2 and 7.

I guess the designers thought that sacrificing 48 of EGA's colours in 200-line modes was a small price to pay for making the EGA monitor compatible with CGA cards. Presumably they thought that if you had an EGA card and an EGA monitor you would be using 350-line mode anyway, or be running legacy CGA software which wouldn't miss those extra colours.

One thing I haven't mentioned here is the PCjr graphics. For the purposes of the discussion above it's essentially the same as CGA (it has the same outputs) but it's more flexible and slower due to the use of system RAM as video RAM, as many 8-bit microcomputers did in the 80s.

I bought an XT

Wednesday, September 28th, 2011

For a while now I've been wanting to write a cycle-exact emulator for the original IBM PC and XT machines that are the direct ancestors of the machine I'm writing this on (and, almost certainly, the machine you're reading this on). I've written an 8088 emulator with cycle timings that I think are plausible but I have no idea if they're correct or not. The exact details of the timings don't seem to be published anywhere (at least not on the internet) so the only way to determine if they are correct is to compare against real hardware.

So, when I saw a cheap XT for sale on eBay recently, I made a spur-of-the-moment bid, and won it. It is a bit beaten up - the case was bent in one place, the speaker cone was falling off and the end of one the ISA slots was broken off. All these problems were easy to fix with a hammer and a bit of superglue, though. It lacks keyboard and monitor, which makes it rather difficult to do anything useful with it, but it did come with all sort of weird and wonderful cards:

  • Hyundai E40080004 MDA card with 66Kb of RAM. It's all discrete logic apart from the CRTC, RAM and a ROM which I think is a character ROM rather than a BIOS ROM (though I could be wrong). The amount of memory makes me suspect it can do graphics, but I can't find any documentation - I'd probably have to reverse engineer a schematic to find out exactly what it's capable of.
  • Tecmar Captain 200044 card with 384Kb RAM (bringing total to 640Kb), serial port, connector for a parallel port and possibly an RTC (it has a CR2032 battery on it anyway).
  • AST 5251/11 - apparently this enables PCs to connect, via Twinax, to a 5251 terminal server. It has the largest DIP packaged IC I've ever seen - a Signetics N8X305N RISC Microprocessor running at 8MHz (16MHz crystal) with 6KB of ROM and 96Kb16KB of SRAM (12KB on a daughterboard) for its own purposes.
  • A generic serial+parallel card.
  • IBM floppy and MFM hard drive controller cards.
  • IBM serial card.
  • PGS scan doubler II. It seems to be pretty rare, there's only one mention of it on Google and I've never heard of such a device being used with PCs before (though I understand they were more popular in the Amiga-verse). It's only uses the power and clock lines from the ISA bus - it has two CGA-style ports on the back, one for input and one for output. You loop the CGA card's output back into one of the ports, and the other one outputs a signal with twice the line rate (it buffers each line in its internal 2Kb RAM and outputs each one twice, at double the pixel rate). I'm guessing the output had to be a monitor with a CGA input which could run at VGA frequencies, which can't have been all that common.

It also comes with a floppy drive and a hard drive which makes the most horrendous metal-on-metal grinding sounds when it spins up and down (so I'll be very surprised if it still works).

This machine has clearly been a real working PC for someone rather than a perfectly preserved museum piece - it tells stories. At some point the original MDA card failed and was replaced with a clone, the RAM was upgraded, it's been used as a terminal for a mainframe, and at some point the owner read about this device that improves your video output, bought one, found it didn't work with his MDA card but just left it in there.

Due to lack of keyboard and monitor (neither my TV nor my VGA monitor can sync to MDA frequencies) I haven't got it to boot yet. I tried to use the scan doubler with the MDA and my VGA monitor (connecting the mono video signal via the red channel of the doubler) and the monitor was able to sync but the output was garbage - I guess the doubler is either broken or only works with CGA frequencies. If it does work with CGA then it'll be useful for seeing the TTL CGA output (though I'll have to put something together to convert the RGBI digital signals to analogue RGB - with proper fix up for colour 6 of course).

I ordered a CGA card but decided to see if I could jerry-rig something up in the meantime. I programmed my Arduino to pretend to be an XT keyboard and also the "manufacturing test device" that IBM used in their factories to load code onto the machine during early stage POST (it works by returning 65H instead of AAH in response to a keyboard reset). I then used this to reprogram the CRTC of the MDA to CGA frequencies (113 characters of 9 pixels at 16MHz pixel clock for 18 rows (14 displayed) of 14-scanline characters plus an extra 10 scanlines for a total of 262 scanlines). The sources for this are on github.

Next, I connected the hsync, vsync, video and intensity lines to a composite output stage like the one in the CGA card (it's just a transistor and a few resistors) and put some junk in video memory. Amazingly, it works - there is a barely legible picture. Even more amazingly, it is in colour! On the same breadboard I was doing this on, I had a Colpitts oscillator driving a 3.5795MHz (NTSC colour burst frequency) crystal from an earlier experiment (before my XT arrived I was trying to get colour TV output from my Arduino). This oscillator wasn't connected to anything, but the very fact that that frequency was bouncing around nearby was enough to turn off the colour killer circuit in the TV and allow it to interpret certain horizontal pixel patterns as colours.

The colours themselves aren't actually related to the picture in any useful way - the hsync and crystal aren't in sync so the phase (and hence the hues) drift over time. In fact, by applying slight heat and/or pressure to the crystal with my fingers, I can change the frequency slightly and make the hue phase drift rate faster or slower with respect to the frame rate, and even stop it altogether (though it's still not a multiple of the line rate so the colours form diagonal patterns).

The sync isn't quite right - because the hsync and vsync signals are just added together the TV loses horizontal sync for 16 lines or so during vsync and then spends half the picture trying to recover. Unfortunately the CRTC in the MDA card has a vertical sync pulse height fixed at 16 lines but it needs to be closer to 3 for NTSC so I haven't been able to get a stable signal even by XORing the signals like the CGA does. The CGA uses a 74LS175 to get a 3-line sync signal, but I don't have one of these to hand.

Here's the schematic for the circuit as I would have made it if I had the parts:

Unfortunately I haven't been able to continue the BIOS POST sequence after running this code - I tried jumping back into the BIOS at a couple of places but it just froze. I'll have to tinker with it some more to see if I can get it to work and determine where the POST is failing next.

I've determined that it should be possible for the XT to send data back over the keyboard line (the clock line is controllable by software). So I'm planning to do bidirectional communication between the XT and a host PC entirely over the keyboard port! I'm writing a tiny little OS kernel that will download a program over the keyboard port, run it, send the results back and then wait for another one.

Unfortunately my plans have been derailed because the power supply unit has failed. I noticed that the PSU fan wasn't spinning - I think that has caused some parts in the PSU to overheat. One resistor in there looked very burnt and the resistors for discharging the high-voltage smoothing capacitors were completely open circuit. I replaced all these but it's still not working. I've ordered a cheap ATX power supply and will be transplanting the guts into the XT PSU's box so that I can keep the big red switch.

Final interval bars code (I hope)

Monday, August 8th, 2011

I think I've now got the optimal implementation of the PIC12 code for interval bars. It's gone through many rewrites since my last post on the subject. I decided to get rid of the "heartbeat" after all in favor of a burst system which sends and receives 9 bits (all the information for one bar) at a time every 100 clock cycles or so and synchronizes once in each direction during that period, right before data transmission. This means we can use 3-pin connectors instead of 4-pin connectors. A 2-pin connector isn't really practical since extra electronics would have to be added to separate and recombine the power and data signals.

The downside to this approach is that the microcontroller in the "root" box now has two time-critical tasks - reading the bits as they come in (can't just request one when we're ready for it any more) and outputting audio samples. But I think that is managable, especially if there are queues so that the interrupt routines can just add to or remove from their respective queue and the real work can be done in the foreground. The average data transmission rate is one bar every 317 cycles - the other 217 are spent in the "prime" phase where each bar discovers which bars are connected to it and cycles are broken to turn the graph into a tree. The data rate is about 3,154 bars per second or about 32ms per update with 100 bars - a workable latency for musical purposes.

The program takes 496 instruction slots of the available 512 and 21 bytes of RAM of the available 25. The source file is just 354 lines.

I realized early on that there wasn't going to be space (in flash or RAM) or time for any debugging code so that this program would be impossible to debug on real hardware. I knew I'd never get it right the first time, so it was necessary to write a simulator. There is an existing simulator included with the Microchip tools, but I couldn't get it to work properly and in any case it certainly wouldn't support programmatically randomly plugging and unplugging as many as 100 instances. So I wrote my own cycle exact simulator. Actually it had to be rather better than cycle exact to simulate the fact that the microcontrollers run at slightly different speeds. My simulated timebase is about 39 picoseconds, giving a frequency resolution of about 39Hz - 512 steps between 0.99MHz and 1.01MHz.

After getting the simulator working, I spent a long time cycling through a process that looks like this:

  1. Run the program in the simulator.
  2. Discover that after a while it locks up or produces incorrect results for an extended period.
  3. Look at various diagnostics I added (up to and including full interleaved instruction traces) to figure out what went wrong.
  4. Adjust the program to avoid the problem, and repeat.

Most of the time, a trip through this loop increases the time-to-failure by a factor of between 2 and 10, but occasionally, it's turned out that there was no simple fix to the problem - the program required substantial rewrites to avoid the situation. These rewrites in turn have their own bugs, and the time-to-failure again becomes very small. It got easier, though - the same sorts of problems kept cropping up and I got better at recognizing them with time. Also, at the beginning I kept having to interrupt the cycle to write more diagnostic code when my existing techniques proved insufficient.

With the current version the simulation ran for more than a week of real time (91 hours of simulated time), went through 15,371,546 configurations with a worst settling time of 92ms.

The best version before this one ran for 774430 reconfigurations and 9 hours of real time (about 4.5 hours of simulated time) before getting itself into a state from which some of the bars stopped responding. That problem took a week to track down and because it happens so rarely. The story of how it happens is kind of like a distilled version of a theatrical farce. There is one signal line for communication which can be in one of two states. As the program progresses, signals of different meanings need to be exchanged (there are about 27 different meanings in the latest version). The two communicating bars need to be "on the same page" about what the meaning of a 0 and 1 will be. But because bars can be connected or disconnected at any time, these meanings can become confused. The farce happens when one signal is confused for another and (due to coincidences that would be amazing if I wasn't conspiring to arrange them) this causes a worse confusion later on and so on, escalating until we get to a state from which the system can't recover.

The way out of this mess is by making some of the messages more complicated than a single bit. For example, the "prime" signal which initiates the data transfer is a 6-cycle low, a 31-cycle high and another 6-cycle low. The receiving code checks the line twice (37 cycles apart) for lows and in the middle somewhere for a high. This means that it can't be confused with either the 9-bit data signal (which is at most 36 cycles of low in a row) or for a single long low signal. The response to this is an 8-cycle low, an 8-cycle high and then a low of variable length (in previous versions it was a single long low of varying length). This increases the number of "this can't happen" signals. When we detect one of these we can put the program into a state that is robust against further unexpected input.

A continual battle with this program has been making it as fast as possible whilst still being reliable and fitting in the available space. There isn't enough space to duplicate any significant part of the program for each of the 12 combinations of input and output pin, so I initially divided it up into "read from pin x" and "write to pin x" subroutines. The "write to pin x" subroutines can then be folded together by means of a couple of variables whose values can be written to the IO port to signify a low and a high respectively. Since reading from a memory location takes the same time as loading a constant, there's no cost to this indirection (apart from the setup code which has to initialize these variables depending on the pin we need to write to). The read subroutines can't be factored this way because the bit to read from is encoded in the opcode of the instruction which tests a bit. Using an "extract bit x" subroutine would have slowed the program down too much.

Phew. I think that (per line and per byte) this was the most difficult-to-write program I've ever written. Brian Kernighan is often quoted as saying "Debugging is twice as hard as writing the code in the first place. Therefore, if you write the code as cleverly as possible, you are, by definition, not smart enough to debug it." However, there is a corollary to this - if you write a program that's as clever as you can make it and then force yourself to debug it, you become twice as smart in the process.

Edit 14th July 2013:

LFT said it better than I could.

CGA: Why the 80-column text mode requires the border color to be set

Saturday, October 17th, 2009

The original IBM Color Graphics Adapter has a curious quirk - it won't by default display colour on the composite output in 80-column text mode. By looking at the schematics, I've figured out why this is, and what the CGA's designers could have done differently to avoid this bug. The following diagram illustrates the structure of the various horizontal and vertical sync pulses, overscan and visible areas in the CGA.

There are two horizontal sync pulses - there's the one generated by the 6845 (the 160-pixel wide red/grey/yellow band in the diagram) and there's the one output to the monitor (the 64-pixel wide grey band within it). The CGA takes the 6845's hsync pulse and puts it through various flip flops to generate the output hsync pulse (delayed by 2 LCLKs and with a width of 4 LCLKs) and also the color burst pulse (in yellow, delayed by 7 LCLKs and with a width of 2 LCLKs).

The 6845 can generate an hsync pulse anywhere from 1 to 16 clock ticks in width. The IBM's BIOS sets it up at 10 ticks (as shown in the diagram). However, in 80-column text mode those ticks are only half as wide, so only extend 3/4 of the way through the output hsync pulse. The 6845's hsync pulse ends before the color burst pulse gets a chance to start, so it never happens and the display will show a monochrome image.

By changing the overscan color to brown, one can create one's own color burst signal at the right point in the signal, and this was the usual way of working around the problem (possibly the only way that works reliably)

By changing the 6845's pulse width to the maximum of 16, one could generate the first half of the color burst pulse (I think) and some monitors might recognize this as a color burst.

If the CGA's designers had started the output hsync pulse at the beginning of the 6845's hsync pulse (or delayed by only 1 LCLK instead of 2) then using the maximum pulse width would have been sufficient to generate the correct color burst. I guess they were just trying to center the output hsync pulse and the color burst within the 6845 pulse, without thinking of the high-res case.

The diagram also shows why interlaced mode doesn't work on the CGA - the output vertical sync pulse is generated in a similar way to the output horizontal sync pulse, only it's 3 lines instead of 4 LCLKs. It always starts at the beginning of an output hsync pulse, so a field can't start halfway through a scanline.

CGA: Reading the current beam position with the lightpen latch

Friday, October 16th, 2009

Here is a little known trick that a genuine IBM Color Graphics Adapter can play, that I noticed when looking at its schematic recently. There are two ports (0x3db and 0x3dc) which are related to the light pen. A read to or write from 0x3db clears the light pen strobe (which you need to do after reading the light pen position so that you'll be able to read a different position next time). A read to or write from 0x3dc sets the light pen strobe - what's the point of that? One possibility might be to implement a light pen that signals the computer in a different way (via an interrupt) rather than being connected directly to the CGA card. That wouldn't work very well though - the interrupt latency of the original IBM PCs was extremely high.

Another possibility is to allow the programmer to directly find the position of the beam at any moment, to an accuracy of 2 scanlines (in graphics modes) and one character width (1/40th of the visible screen width in graphics modes and 40-column text modes, 1/80th of the visible screen width in 80-column text modes). Read from 0x3db and 0x3dc and then read the light pen CRTC registers to find out where the beam was when you read from 0x3dc. This technique is so obscure it probably won't work on non-IBM CGA cards, so its usefulness is rather limited. Might be useful for an oldskool demo, though. I'll be sure to implement this technique when I finally get around to making my extremely accurate PC emulator.

Scaling/scanlines algorithm for monitor emulation

Monday, October 12th, 2009

For my TV emulation, I wanted to render scanlines nicely and at any resolution. xanalogtv does vertical rescaling by duplicating rows of pixels, which unfortunately makes some scanlines appear wider than others. Blargg's NTSC filters don't do any vertical rescaling at all.

The first thing I tried was a sinc interpolation filter with the kernel scaled such that the scanline only covered 70% of the pixels vertically (essentially modelling the scanlines as long thin rectangles). This worked great except that it was far too slow because of the sinc function's infinite extent (I was doing a multiplication for each combination of horizontal position, vertical position and scanline). So I windowed the kernel with a Lanczos window. I got annoying aliasing effects using less than 3 lobes. With 3 lobes it was still too slow because each pixel was a weighted sum of 3-4 separate scanlines. Also, because of the negative lobes I needed extra headroom which meant I either had to reduce my colour resolution or use more than 8 bits per sample (which would also be slow).

The next thing I tried was a Gaussian kernel. This has several nice features:

  1. The Fourier Transform of a Gaussian is also a Gaussian, which is also a better approximation of a scanline than a rectangle (the focussing of the electron beam isn't perfect, so to a first approximation their distribution around the beam center is normal).
  2. It dies off much more quickly than the sinc function.

The Gaussian kernel also gave a good image, so I kept it.

The next thing I wanted to do was improve the speed. I still had several scanlines contributing to every pixel. However, that doesn't make much physical sense - the scanlines don't really overlap (in fact there is a small gap between them) so I figured I should be able to get away with only using the highest coefficient that applies to each pixel. I tried this and it worked beautifully - no difference in the image at large sizes and it speed the program up by a factor of several. The downside was at small sizes - the image was too dark. This is because the filter was set up so that each pixel would be the average of several scanlines, but if only one scanline is contributing then then the brightness is 1/several. To fix this I just divided all the coefficients by the largest. There's no mathematical justification for this, but it looks fine (apart from the fact that some of the scanlines don't contribute to the picture at all).

If each pixel is only in one scanline, lots more optimizations are possible - for example, one can generate the image progressively, a scanline at a time, which helps keep data in the caches.

Finally, I still needed it to be faster so I moved all the rescaling (vertical and horizontal) to the GPU. I came up with a devishly clever hack to implement the same scanline algorithm on the GPU. No shader is needed - it can be done just using textures and alpha blending. There are two passes - the first draws the actual video data. The second alpha-blends a dark texture over the top for the scanlines. This texture is 1 texel wide and as many texels high as there are pixels vertically.

One other complication is that I wanted the video data texture to be linearly interpolated horizontally and nearest-neighbour interpolated vertically. This was done by drawing this texture on a geometry consisting of a number of horizontal stripes, each of which has the same v-texture-coordinate at its top as at its bottom.

Pipeline architecture

Saturday, October 10th, 2009

My software TV/monitor emulator is best thought of as a bunch of filters for transforming a signal in certain ways, connected together in a pipeline:

  • Decoding composite signals to YIQ
  • Transforming YIQ signals to RGB
  • Horizontal rescaling
  • Ghosting due to signal reflection in the cable
  • Adding noise

Because that's the best way to think about it, that's how I'd like to implement it. Then it will be easier to remove/replace filters that I don't need or that I want to implement in a different way. The filters.h file in the crtsim source implements this architecture.

When you have a pipeline, there are two ways to drive it. One is "consumer pulls" and the other is "producer pushes". In this case, the consumer is the code that actually renders the window to the screen. In "consumer pulls" mode, this code will fire at probably 60 times per second (potentially depending on the refresh rate of the monitor on the host machine) and each time it does, it will ask the filter which supplies its data for enough data to render one frame (or field, if we're doing interlaced signals). This filter will then in turn ask the next one along the chain for data and so on up the chain until we get to the code that actually generates the composite signal.

In "producer pushes" mode, the producer generates data at a constant rate (possibly fixed by some other source of time in the system such as the audio device outputting at the correct rate). This data is then pushed from each filter to the next in the chain until it gets to the consumer. When the consumer has collected enough data to render a frame, a frame is rendered.

So for the purposes of emulating a TV or monitor as part of a microcomputer system emulator, "consumer pulls" and "producer pushes" modes can be thought of as "video rate driven" and "audio rate driven" modes respectively. Most emulators are hard-coded to do one or the other. But which one is best is determined by the user's hardware and what they're doing with the emulated system (video driven mode will generally smoother graphics while audio driven mode will generally give more stable audio). So ideally we'd like to make the choice user-selectable.

A third possibility is for the producer code to decide when to draw a frame and to call for a window redraw, which causes a data pull through the filter chain. However, I've discounted this idea because that is an incorrect placement of responsibility. The producer doesn't (and shouldn't) know about the state of the monitor. Even if it has just produced a vsync pulse it doesn't necessarily mean its time for a new frame (if the monitor is "rolling" as it will do momentarily when the signal timebase changes, it won't be).

There is another factor in pipeline design which is how the data stream corresponds to function calls. The simplest way would be to have each sink call the corresponding source each time it needs a sample (in pull mode) or each source call its corresponding sink each time a sample is available (in push mode). However, there are potentially quite a few filters and (because they are all replaceable at run time) each call from one filter to the next will be a virtual function call. That means that the compiler can't inline the code and the CPU's pipelining will get screwed up. According to this one can expect a virtual function call overhead of maybe 13 nanoseconds compared to inlined code (a crude test, but sufficient for order-of-magnitude calculations). Since most of our samples will be at 14MHz (4 times the NTSC color carrier frequency) that's only about 5 virtual function calls per sample before we've used up all our CPU.

So each function call really needs to transfer a pile of samples, not just one, and we will need to have circular buffers in between the filters to keep the data. How many samples should we transfer at once? A good rule of thumb for figuring that out is that one's hottest code and data should fit in L1 cache (which is maybe 64Kb on modern CPUs). Divide that up by the number of steps in the pipeline and we're looking at low-single-digit numbers of Kb to be passed at once. A scanline's worth of data (910 samples, give or take) is probably about right. That reduces the virtual function call overhead by three orders of magnitude which puts it well into the negligible range. Conceivably one could try benchmarking with lots of different "samples per call" values and then pick the one with the best overall performance (taking into account both call overhead and cache misses). I'll probably do this at some point.

One disadvantage of the pipeline architecture is that it introduces some variable amount of latency - not enough to normally be visible to end users, but this does complicate one thing that I want to emulate - light pens. A light pen is just a fast light sensor that can be placed anywhere on the screen. When the electron beam passes underneath it, it sends a signal to the computer. The computer knows where the beam is supposed to be at any given moment, so it can figure out where the light pen is. However, for an emulator to have proper lightpen support, it needs to have very low latency between the screen and the machine emulation. For this reason, I might abandon the pipeline architecture and just hard-code all the signal munging effects I care about in the CRT simulator itself, processing a line at a time and stopping when the horizontal sync pulse is found. Then, if the lightpen is anywhere on the next line the CRT will be able to tell the machine emulation exactly when the lightpen is going to be triggered.

NTSC hacking

Friday, October 9th, 2009

Recently I've been playing about doing NTSC decoding in software, trying to build an software TV/monitor for emulation purposes. I originally wanted to do the decoding of sampled composite signals to RGB and the horizontal scaling in a single step (precomputing a finite impulse response filter which does it all). However, I have come to realize that while this would yield the fastest code, it's not sufficiently flexible for what I want to do.

Specifically, in the signals I want to decode, the horizontal sync pulses can happen at any point (within a certain range) which means that the relationship between samples and horizontal pixel positions is not fixed in advance. This means that it's better to do the decoding (at least composite to YIQ if not all the way to RGB) at a fixed frequency and then rescale the result to pixels in real time (possibly using linear or cubic rescaling).

Having determined this, I looked to see what other NTSC software implementations do. Blargg's NES filter rescales at a ratio of 3:7 at the same time as it decodes, then it's up to the calling code to rescale this to the right width. xanalogtv converts composite to YIQ at 4 samples per color carrier cycle, uses linear rescaling on the YIQ samples and then converts the result to RGB. The resulting pixels may be doubled or tripled to get to the right width. This also allows for nice effects such as "blooming" (widening brighter lines).

My current simulator is here and the source is here (Windows only for now - sorry). This uses similar techniques to xanalogtv, but the rescaling is done by the GPU, in RGB space. The scanline effects are a bit more accurate (all the scanlines appear to be the same width, no matter what size the window is), and a phosphor mask is displayed. Most reasonably modern machines should be able to display the images at full speed (60Hz). If your machine is too slow or your monitor doesn't run at 60Hz there may be some odd effects (most LCD panels run at 60Hz). I believe this is the only software CRT simulator that correctly renders both interlaced and non-interlaced signals, and has physically correct phase-locked-loop line frequency behavior. If I can figure out how to add a pixel shader for light bloom, I should be able to get images as good as these (except with arbitrary scaling in real time).

One other rough edge in this version is that the horizontal sync pulse is currently only found to the nearest sample. This means that the phase locked loop isn't very tunable, and will cause problems for PAL signals (where the horizontal sync position is at a different subsample offset on every line). That should be quite easy to fix, though.

This simulator is going to form the basis for my demo machine emulator. The emulator itself is trivial - in fact I have already written it. But I haven't tried it out yet because I have no program to run on it. First I have to write an assembler for it. I might tweak the instruction set a bit somewhat in doing so, so I don't want to release the emulator just yet. Watch this space!

Emulation for fun and profit

Saturday, August 2nd, 2008

There's much more that you can do with an emulator than just play old computer games. In fact, I think that the usefulness of emulators is seriously underrated. Here are some useful things I can think of doing with an emulator that has some appropriate extensibility hooks:

  • Debugging. A debugger with an integrated emulator might be able to do the following:
    • Debug a program without the program being able to tell that it is running in a debugger - handy for investigating malware like viruses and DRM.
    • Save (delta) states at each step to make it possible to undo steps or perform backwards-in-time debugging.
    • Debug multi-threaded programs deterministically by simulating multiple threads on a single thread and allowing the user to decide when to context switch.
  • Reverse engineering. The problem of finding the actual code in the binary is Turing-complete in general but if you can find most of the important code by actually running it you can get most of the way there.
  • Static analysis. Finding bugs in code after it's been compiled by running it and (as it runs) checking things that would be difficult to check at compile time (code invariants). For example, assertions might not be compiled into an optimized binary but could be provided as metadata that could be understood by the analyzer. This would be a great help for tracking down those tricky bugs that disappear when you switch to debug binaries.

Modular emulator

Monday, July 14th, 2008

Among the many programs I'd like to write is a replacement for MESS (and possibly also MAME while I'm at it). Don't get me wrong, I think these are fantastic pieces of software but I do have some problems with them that can really only be solved by starting my own emulation project rather than by contributing to them. In no particular order:

  • I like writing software from scratch.
  • They are written in C with all kinds of macro trickery to make it more object orientated. I'd rather write it in C++ or some language of my own devising.
  • I don't like the unskippable startup screens that MAME and MESS use. I'd like to set up a PC emulator using a free clone BIOS and DOS and distribute it as a turnkey method for running old games like Digger.
  • I'd like to make it possible to "build" emulated machines at run time (without having to create a driver etc.). You'd be able to say "connect up this CPU, this sound hardware, this video hardware and load this ROM at this address" and it would all work. The emulator would come with a set of pre-written modules, it would have a language for designing modules and plugging them together and possibly even a graphical designer for wiring things up.
  • MAME and MESS timeslice much more coarsely than I'd like to. They emulate the CPU for a while (until a new frame or an interrupt starts usually) then see what the screen has done in that time, what sound was output in that time and so on. I'd like to timeslice on a cycle by cycle basis for more accurate emulation (so raster effects can be done with horizontal pixel accuracy) and to enable emulation of things like the prefetch cache on the 8088 (the lack of which makes MESS about 30% too fast).This sounds like it would make emulation very slow, but in fact if we organized it well and all the code fits into the CPU cache, we'd be doing no more work than MESS is now.